Last Updated on 2021 年 07 月 7 日 by 編輯
A previous article explained what the Standard Grip is. This article teaches you how to wield a pair of marcosticks (read: chopsticks) with the standard grip. Please note the first publication date of this article (Dec 30th, 2019). You are reading a completely new way of teaching this ancient standard grip. People have been using chopsticks for thousands of years already. But no one had satisfactorily described how chopsticks actually worked, and how to best learn to wield them, until this article came along.
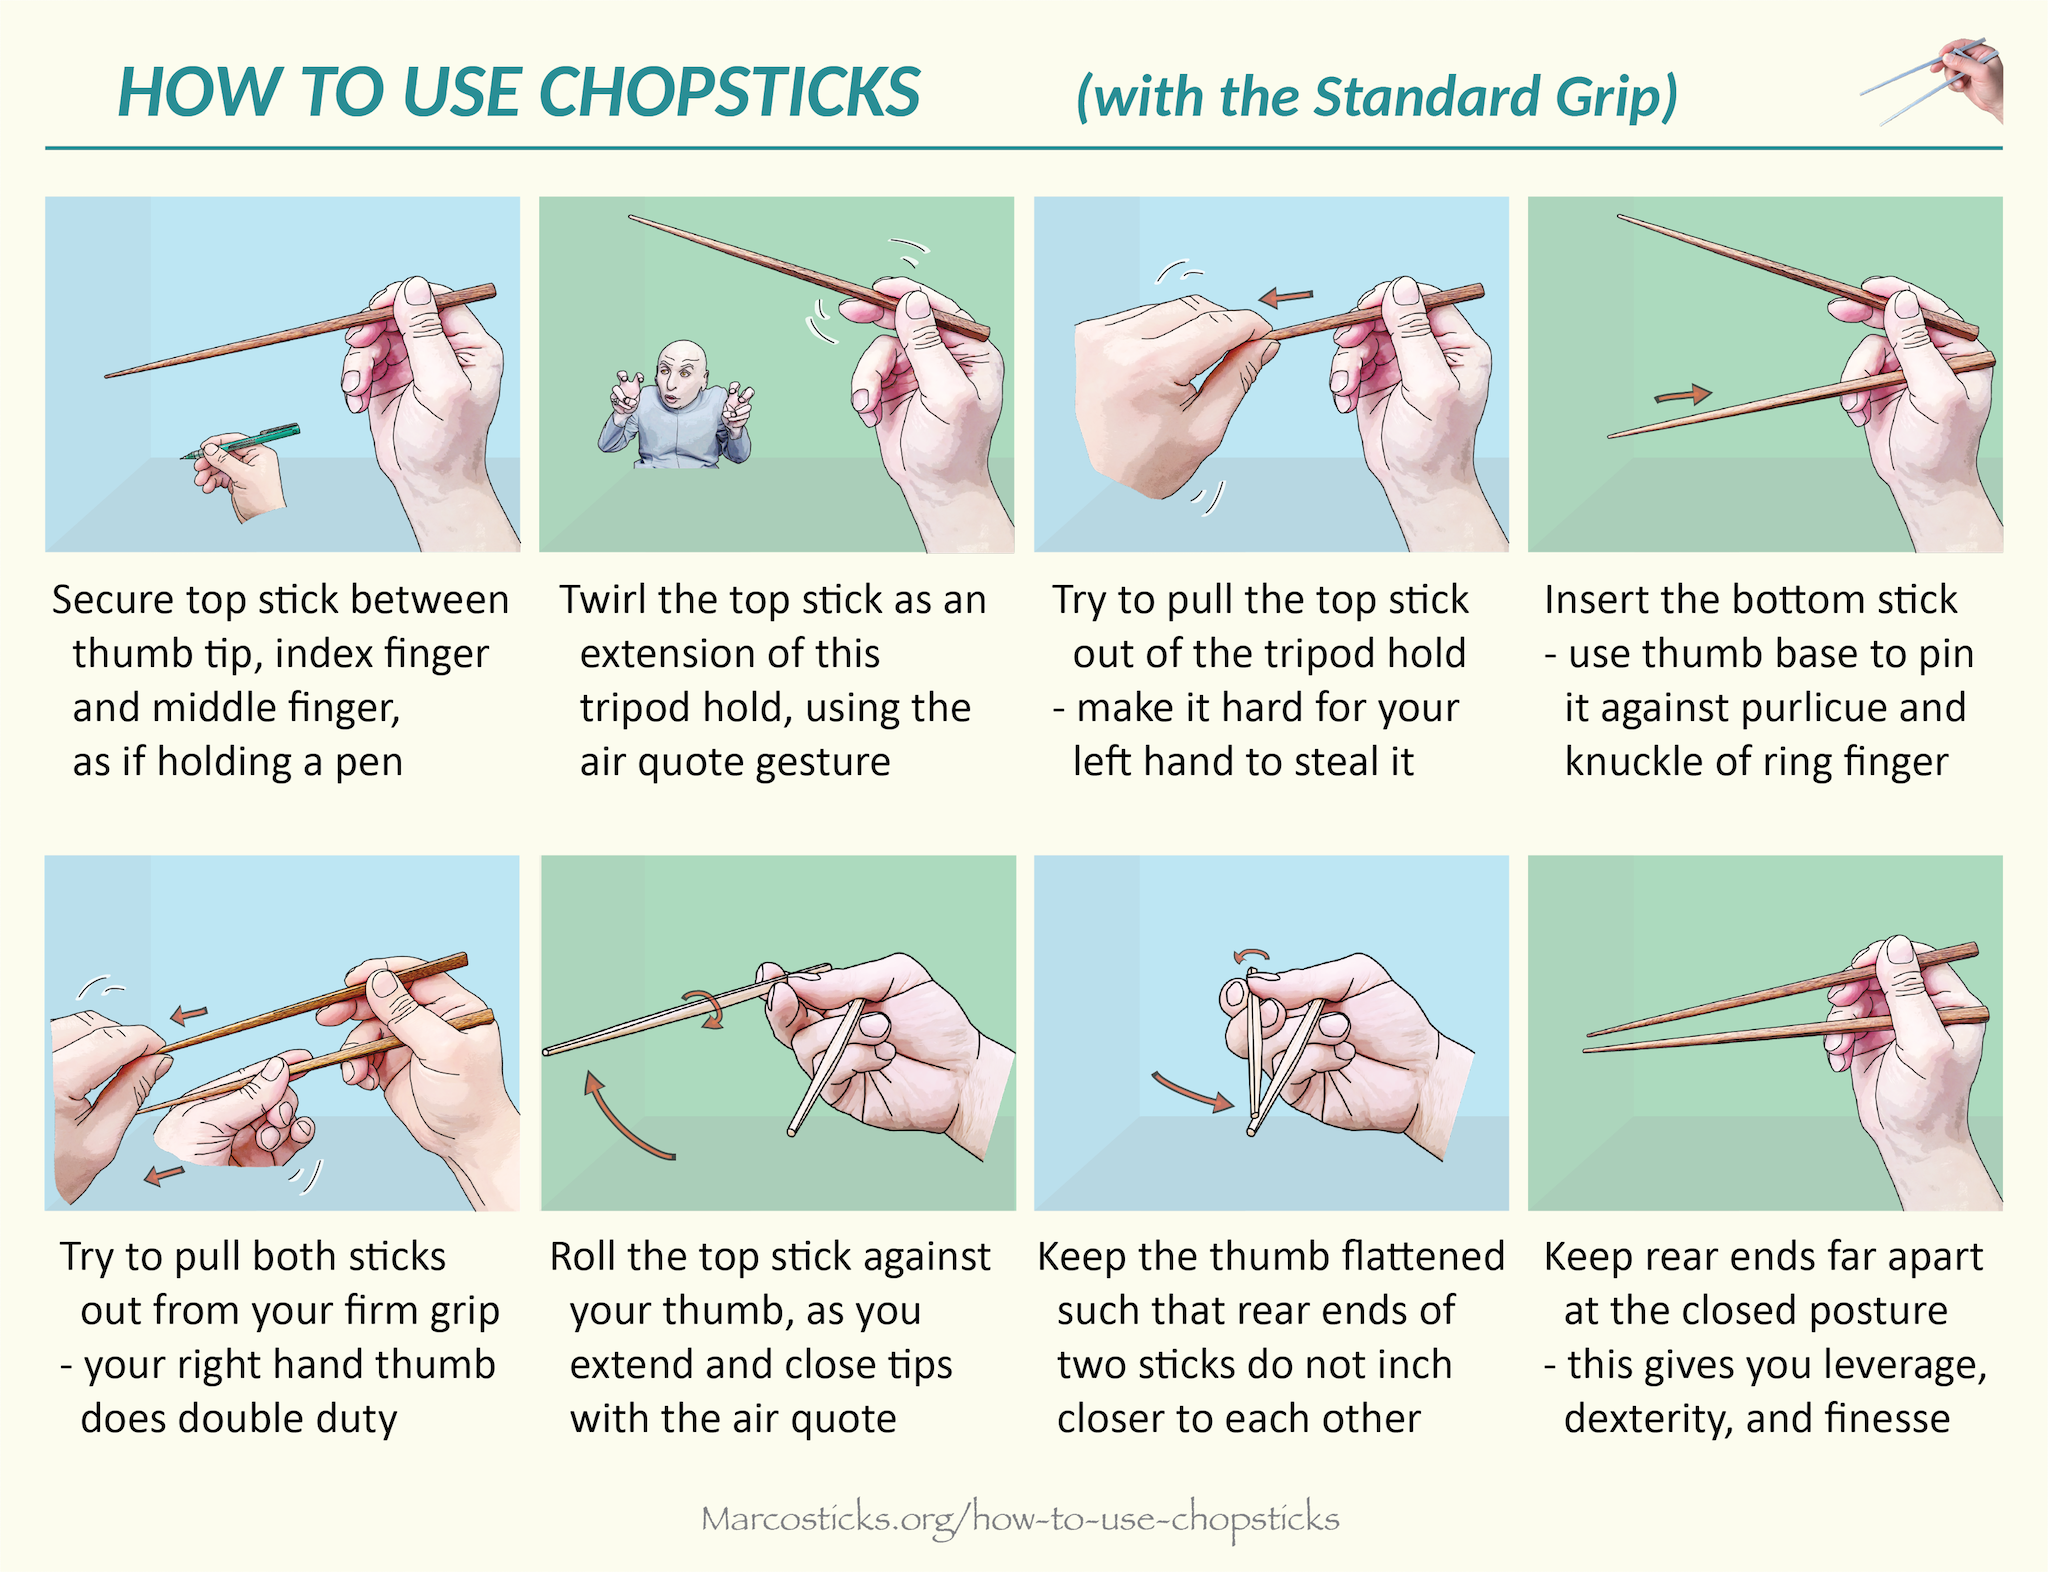
Table of Contents
Names of things
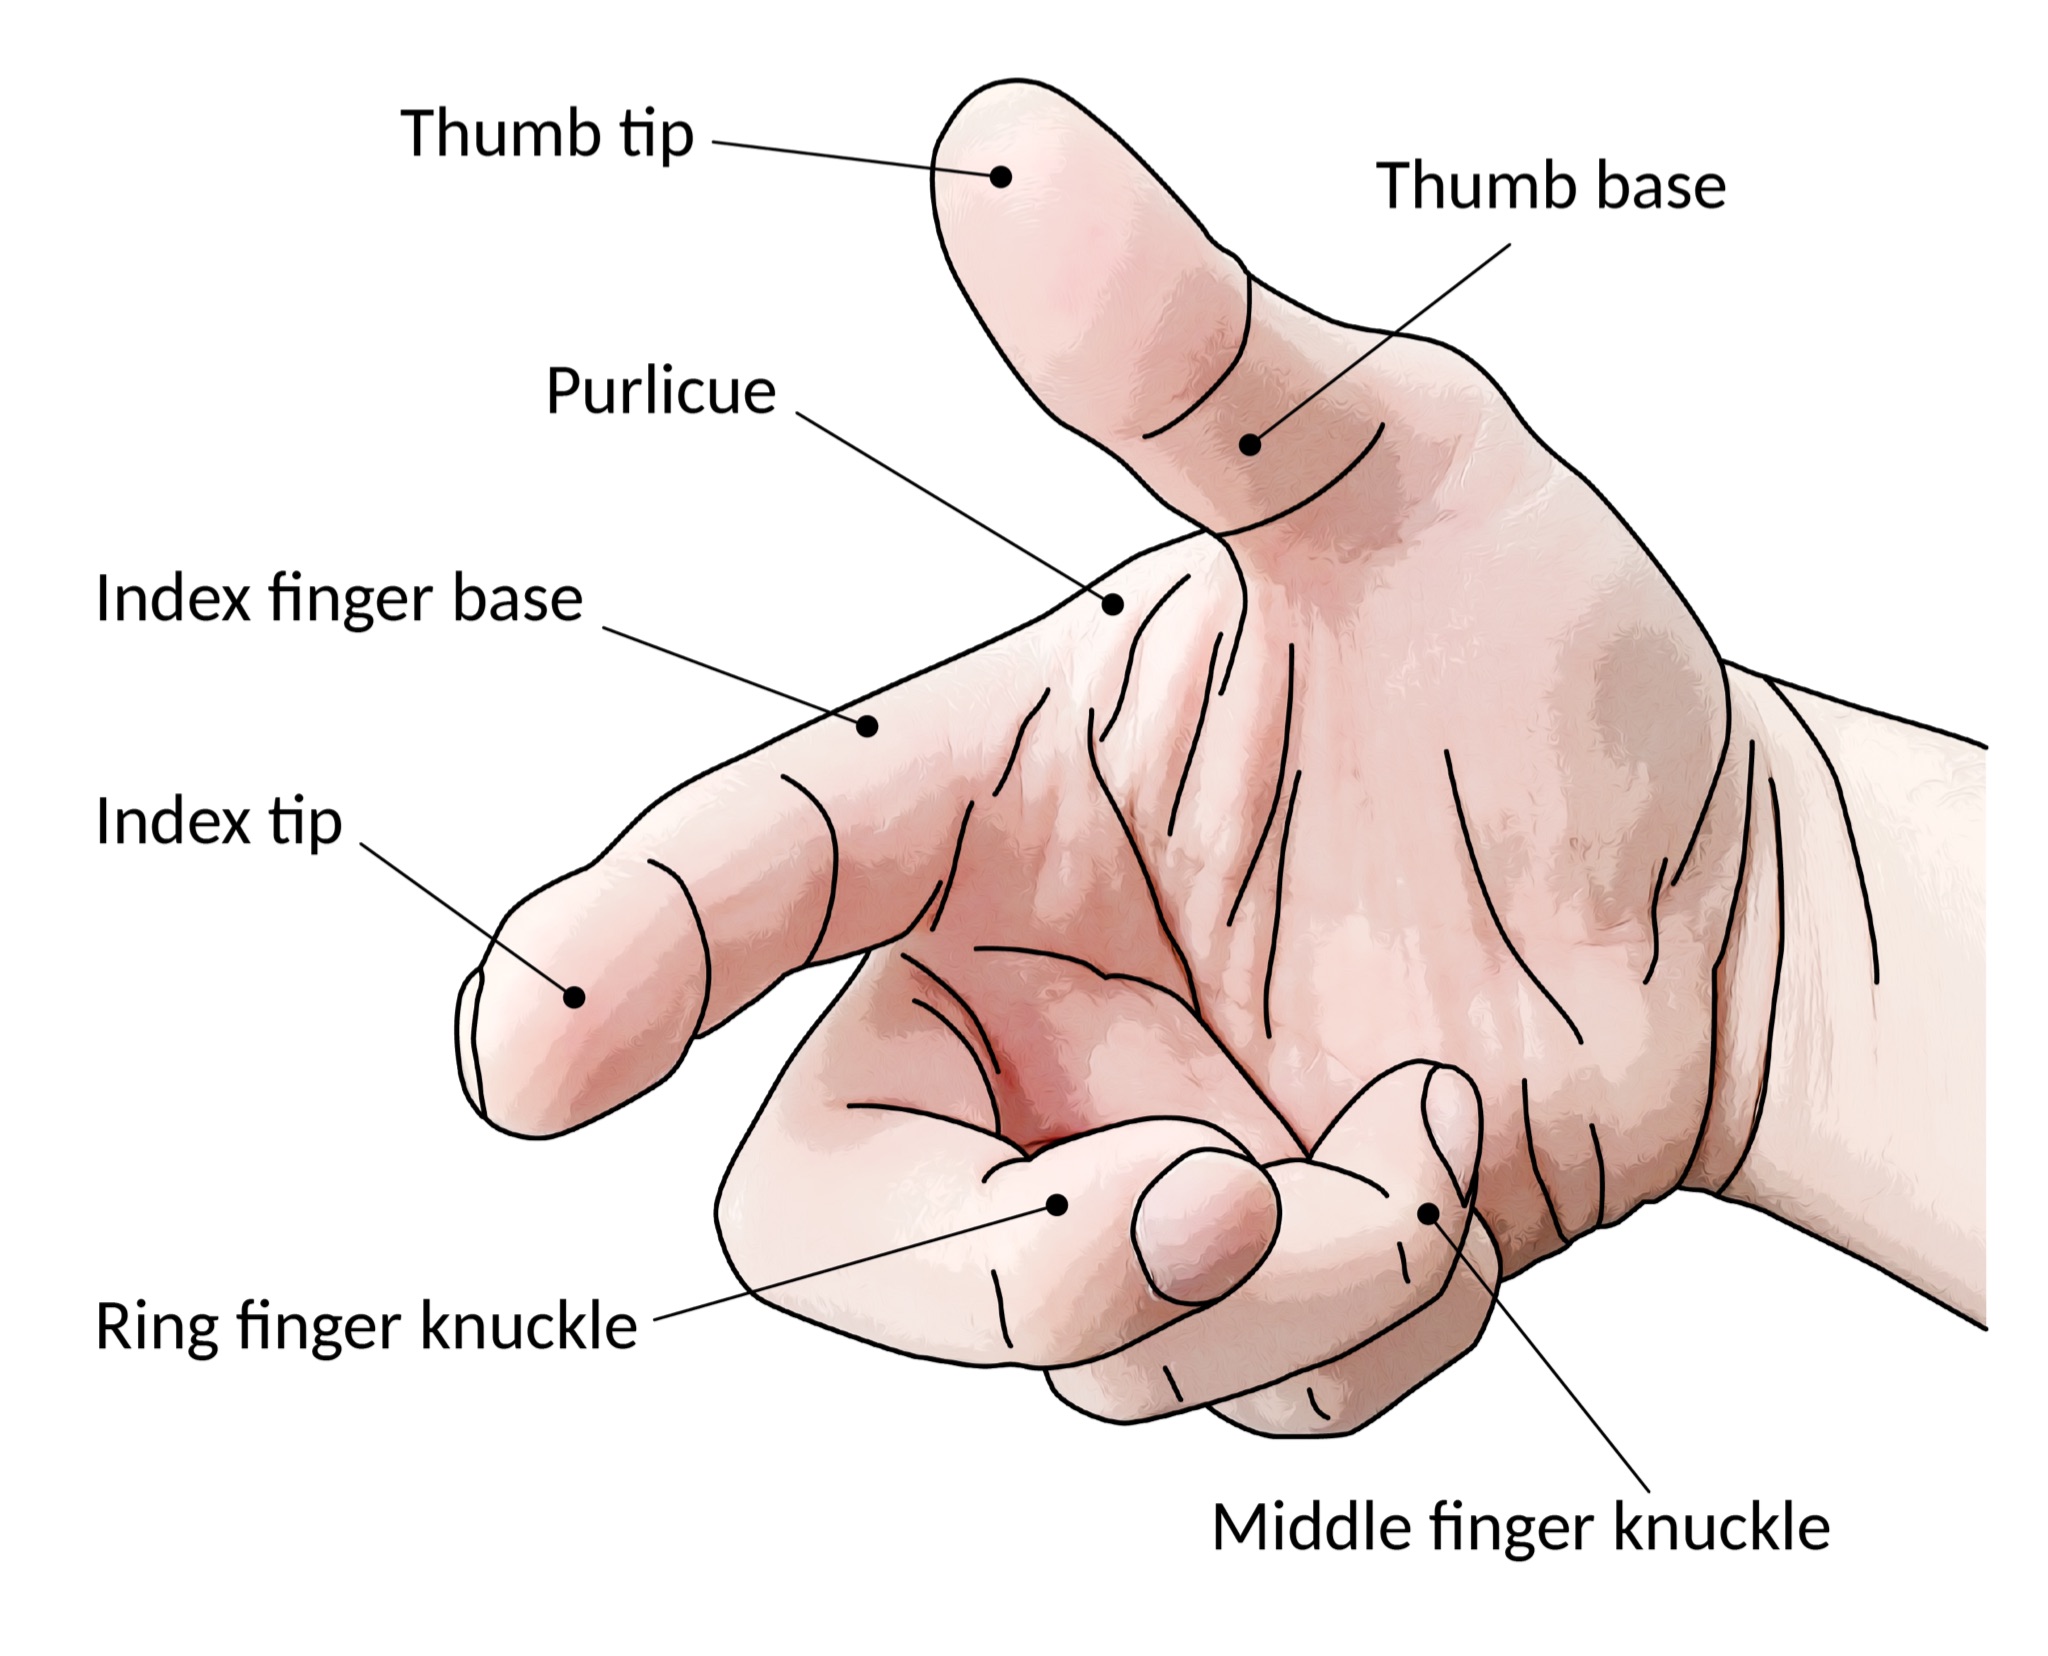
First, let’s name parts of the hand. Consult the below image for figure 3A. An adult right hand is shown in the figure. Four fingers are involved in manipulating chopsticks. They are: the thumb, the index finger, the middle finger, and the ring finger. The web between the thumb and the index finger is the purlicue; it is instrumental in holding the bottom chopstick. The distal segment of a finger is a tip segment. The segment connecting a finger to the palm is a base segment. The segment in between is a center segment. The thumb is the only finger without a center segment. In addition, the knuckle between a tip segment and a center segment is a distal knuckle.
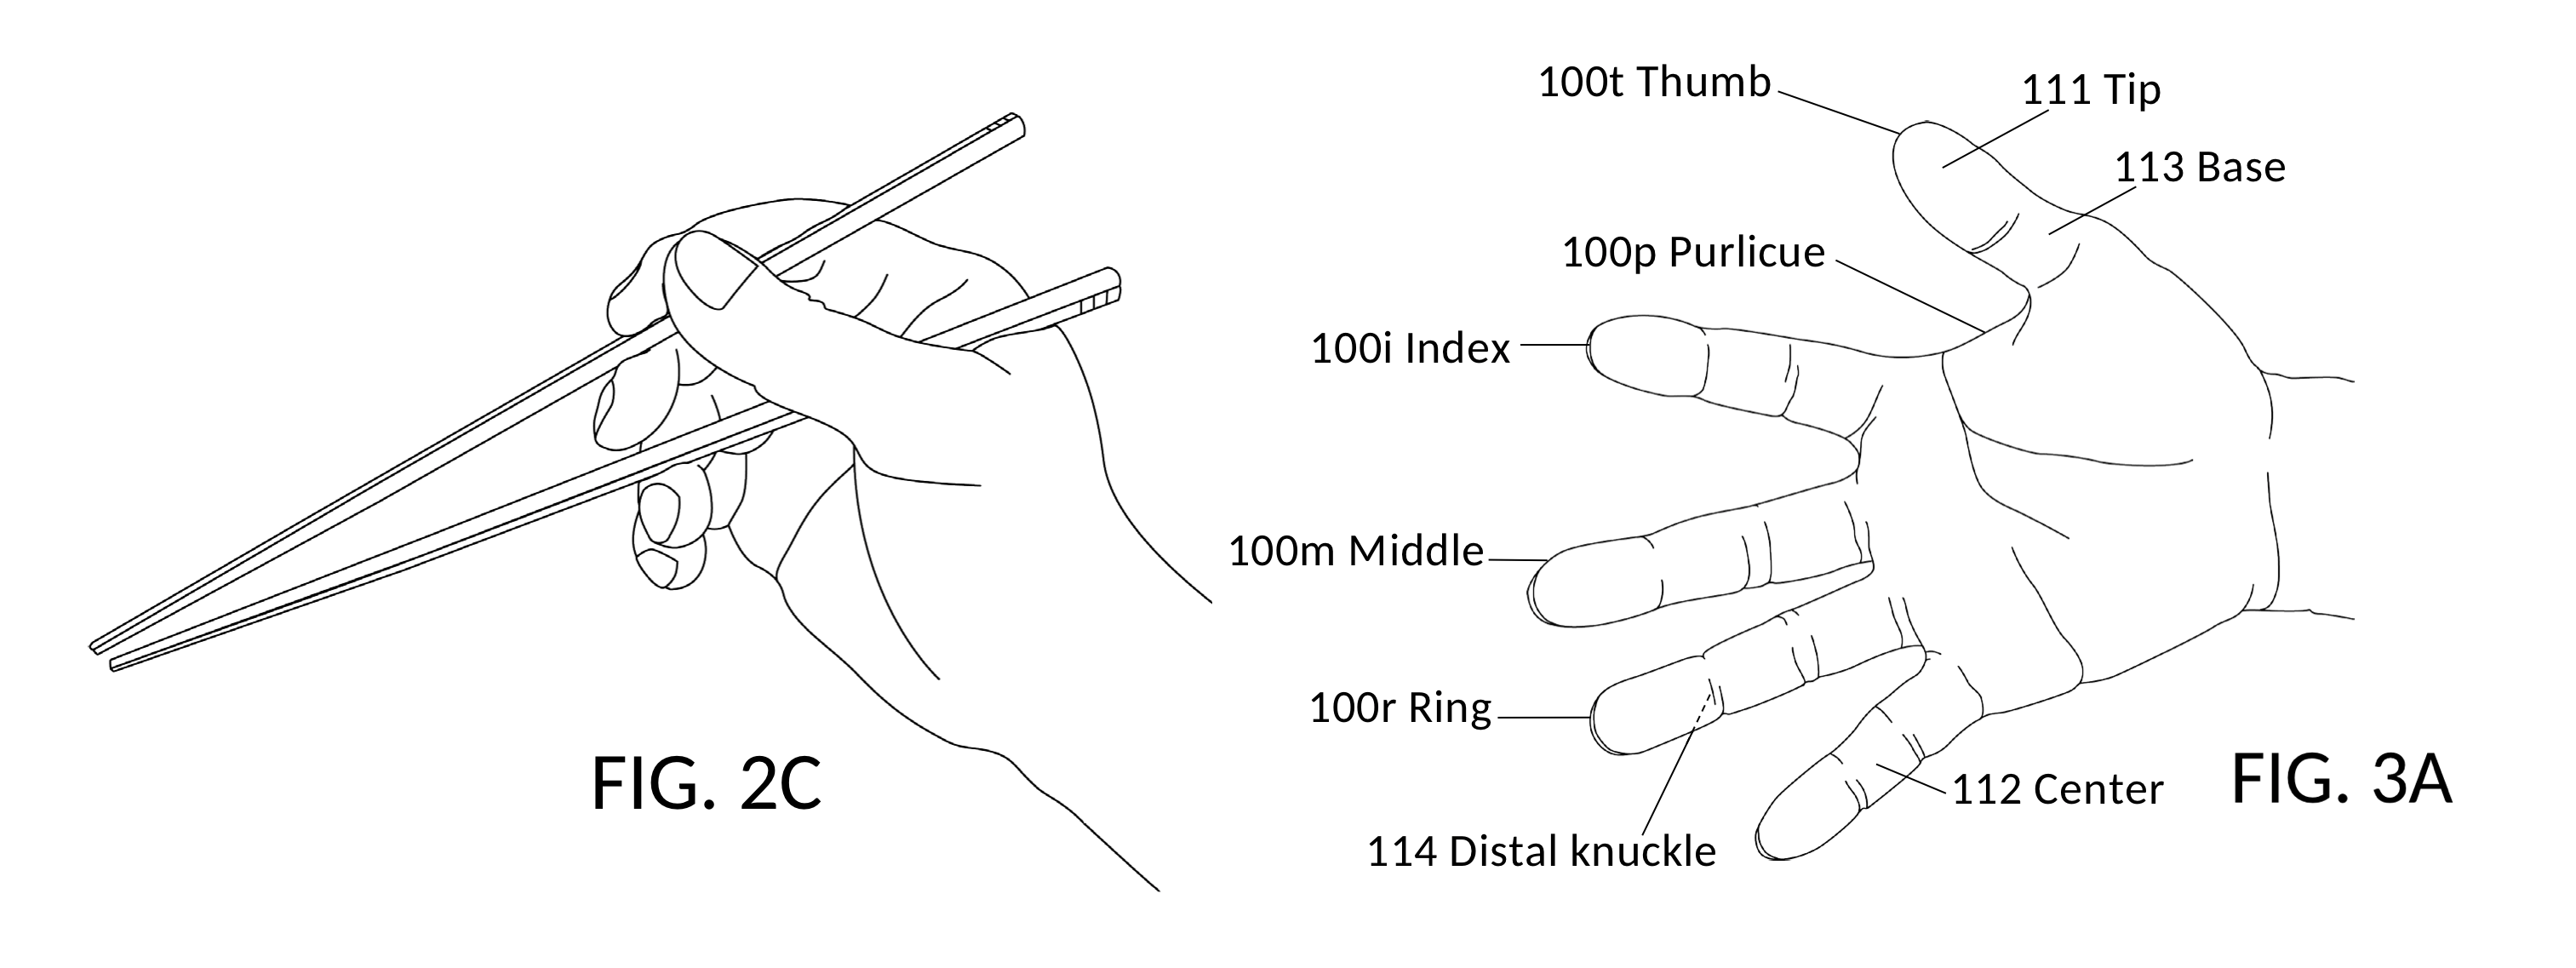
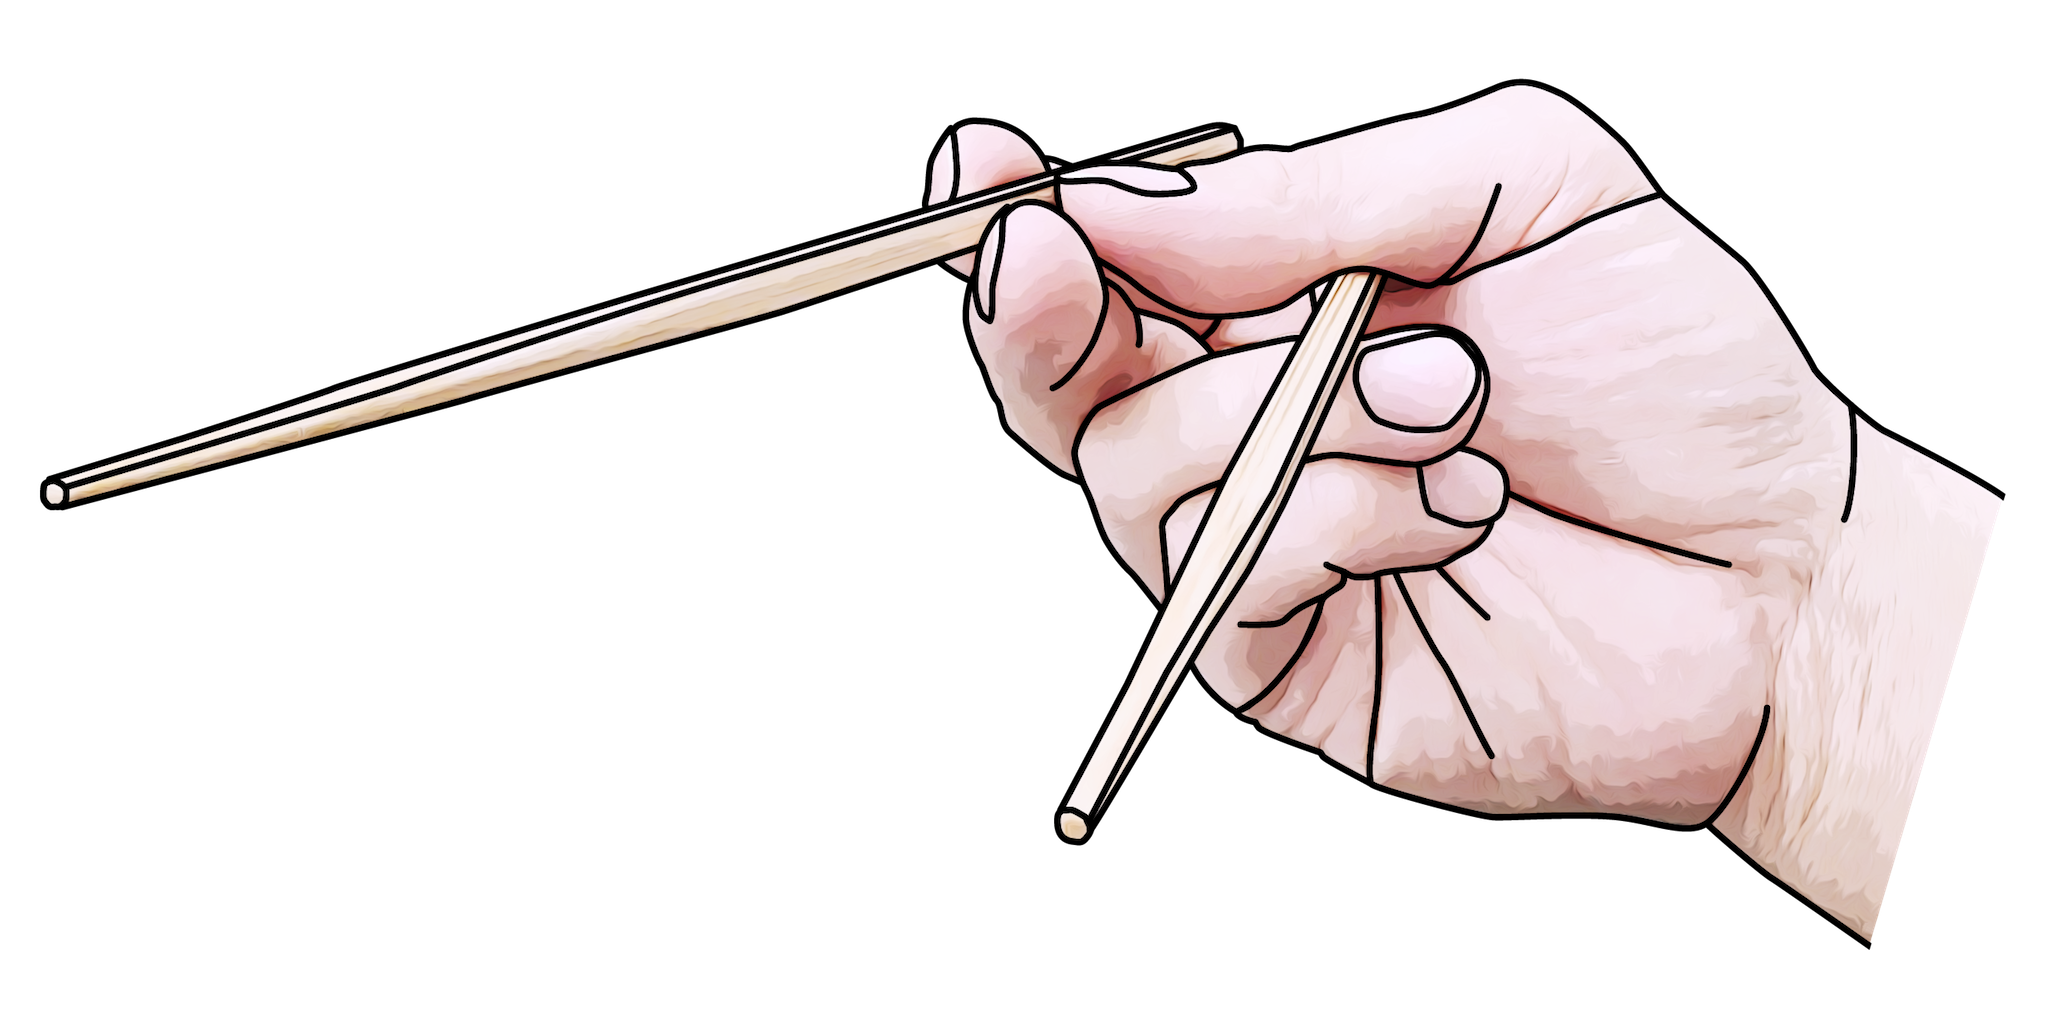
Figure 2C shows a right hand holding a pair of chopsticks. These are known as square chopsticks, because they have a square cross section. These chopsticks measure 9 inches, or 23cm, long. Tips of chopsticks are for picking up food. They are usually tapered. The hand holds chopsticks somewhere between the middle and the rear end of chopsticks.
Initial finger posture
A beginner needs to learn the correct finger posture for gripping chopsticks, before they go on to master the manipulation of these chopsticks. One way to acquire a proper posture is to train on a single chopstick at a time. Start by turn your dominant hand into this configuration.
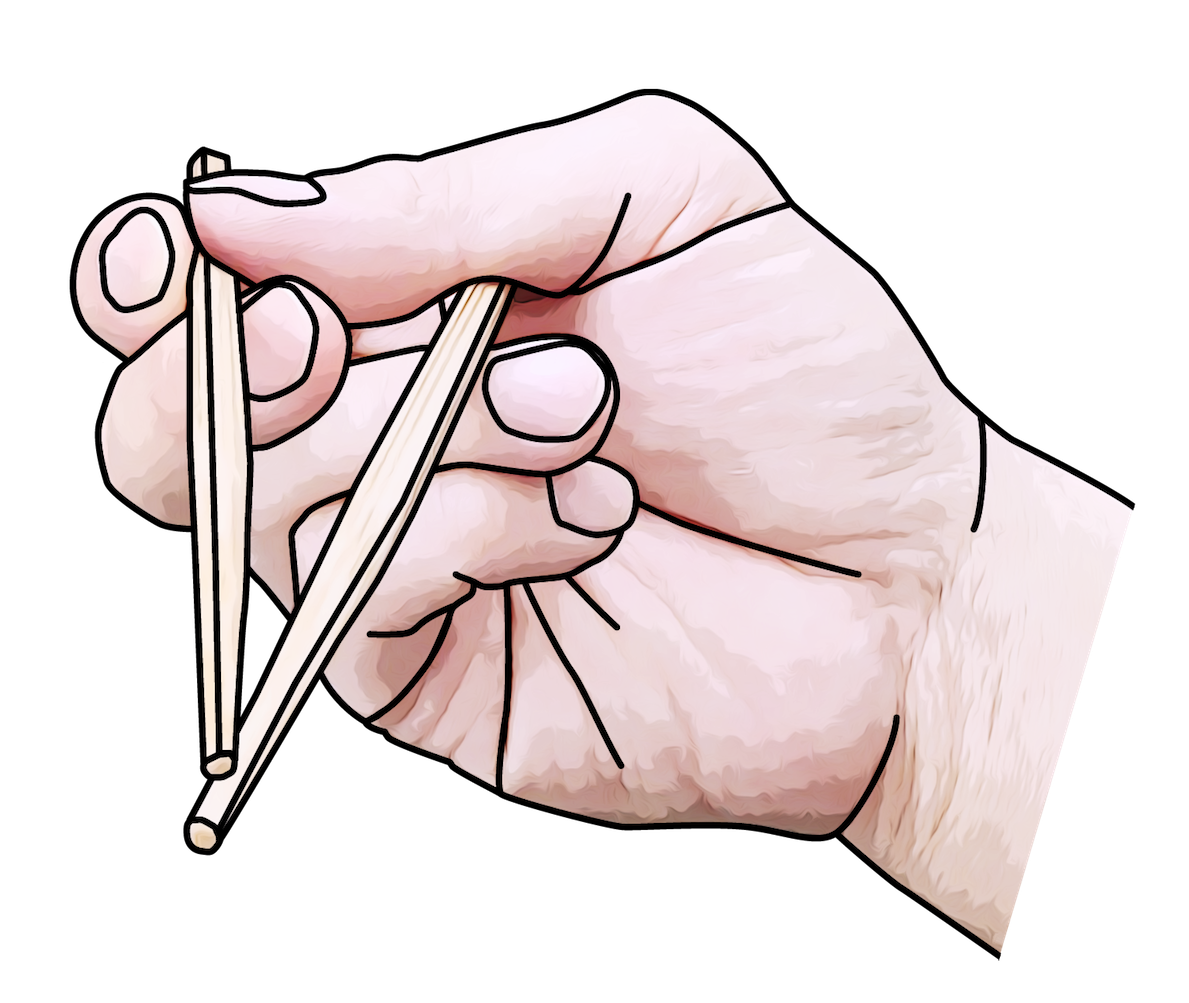
Picking up the top chopstick with three fingers, the thumb, the index finger and the ring finger. Position the top chopstick as illustrated in figure 2C, with the middle section of the chopstick sandwiched between the tip segment of the index finger, and the distal knuckle of the middle finger. Cover the chopstick with the tip segment of the thumb. Rest the rear end of the chopstick on the base of the index finger. Think of the stick as a pen. Hold it like you would a pen. More on this point later, and in the article Hold Chopsticks like a Pen.
Ignore the bottom chopstick at this stage. First learn to securely hold the top chopstick in this posture. In figure 2C, the right hand is used to grip the chopstick. Use the left hand to grab the tip of the chopstick, and attempt to pull the top chopstick away from the right hand. The three gripping fingers of the right hand should surround the chopstick and hold it firmly, to establish good friction and pressure, preventing the chopstick from being pulled away. The right hand, the fingers and the chopstick should not deviate from the closed posture, while resisting the pull. Now, use the left hand to try to wiggle the top chopstick away from the correct orientation. If the three fingers properly surround the chopstick in tripod hold, then the left hand cannot easily move the tip away.

While still holding the top chopstick with the correct posture, use the left hand to insert the bottom chopstick, rear end first, into the gap between the base of the thumb and the purlicue. While tips of the chopsticks touch each other, rear ends of the top chopstick and the bottom chopstick should be spread apart, for at least the length of the base segment of the thumb, as illustrated in figure 2C. Without losing grip on the top chopstick, use the base of the thumb to press the bottom chopstick against the purlicue and against the distal knuckle of the ring finger. That is, the thumb, the ring finger, and the purlicue work together to clamp the bottom chopstick in place.
Note how the thumb does double duty. It is instrumental in gripping both the top chopstick and the bottom chopstick. It is the only finger providing pressure in a direction towards the palm, against all other fingers and the purlicue. Use the left hand to try to wiggle or pull the bottom chopstick away, to confirm that the bottom chopstick is properly gripped.
Here is the entire sequence from the beginning to the end.
Twirl with the air quote gesture
The previous article on the Standard Grip already dispelled the misconception that chopsticks operated under principles of the third-class Archimedean lever. Now you will understand why chopsticks are not levers. You will see that you do not “leverage” chopsticks, so much as you “twirl” them.
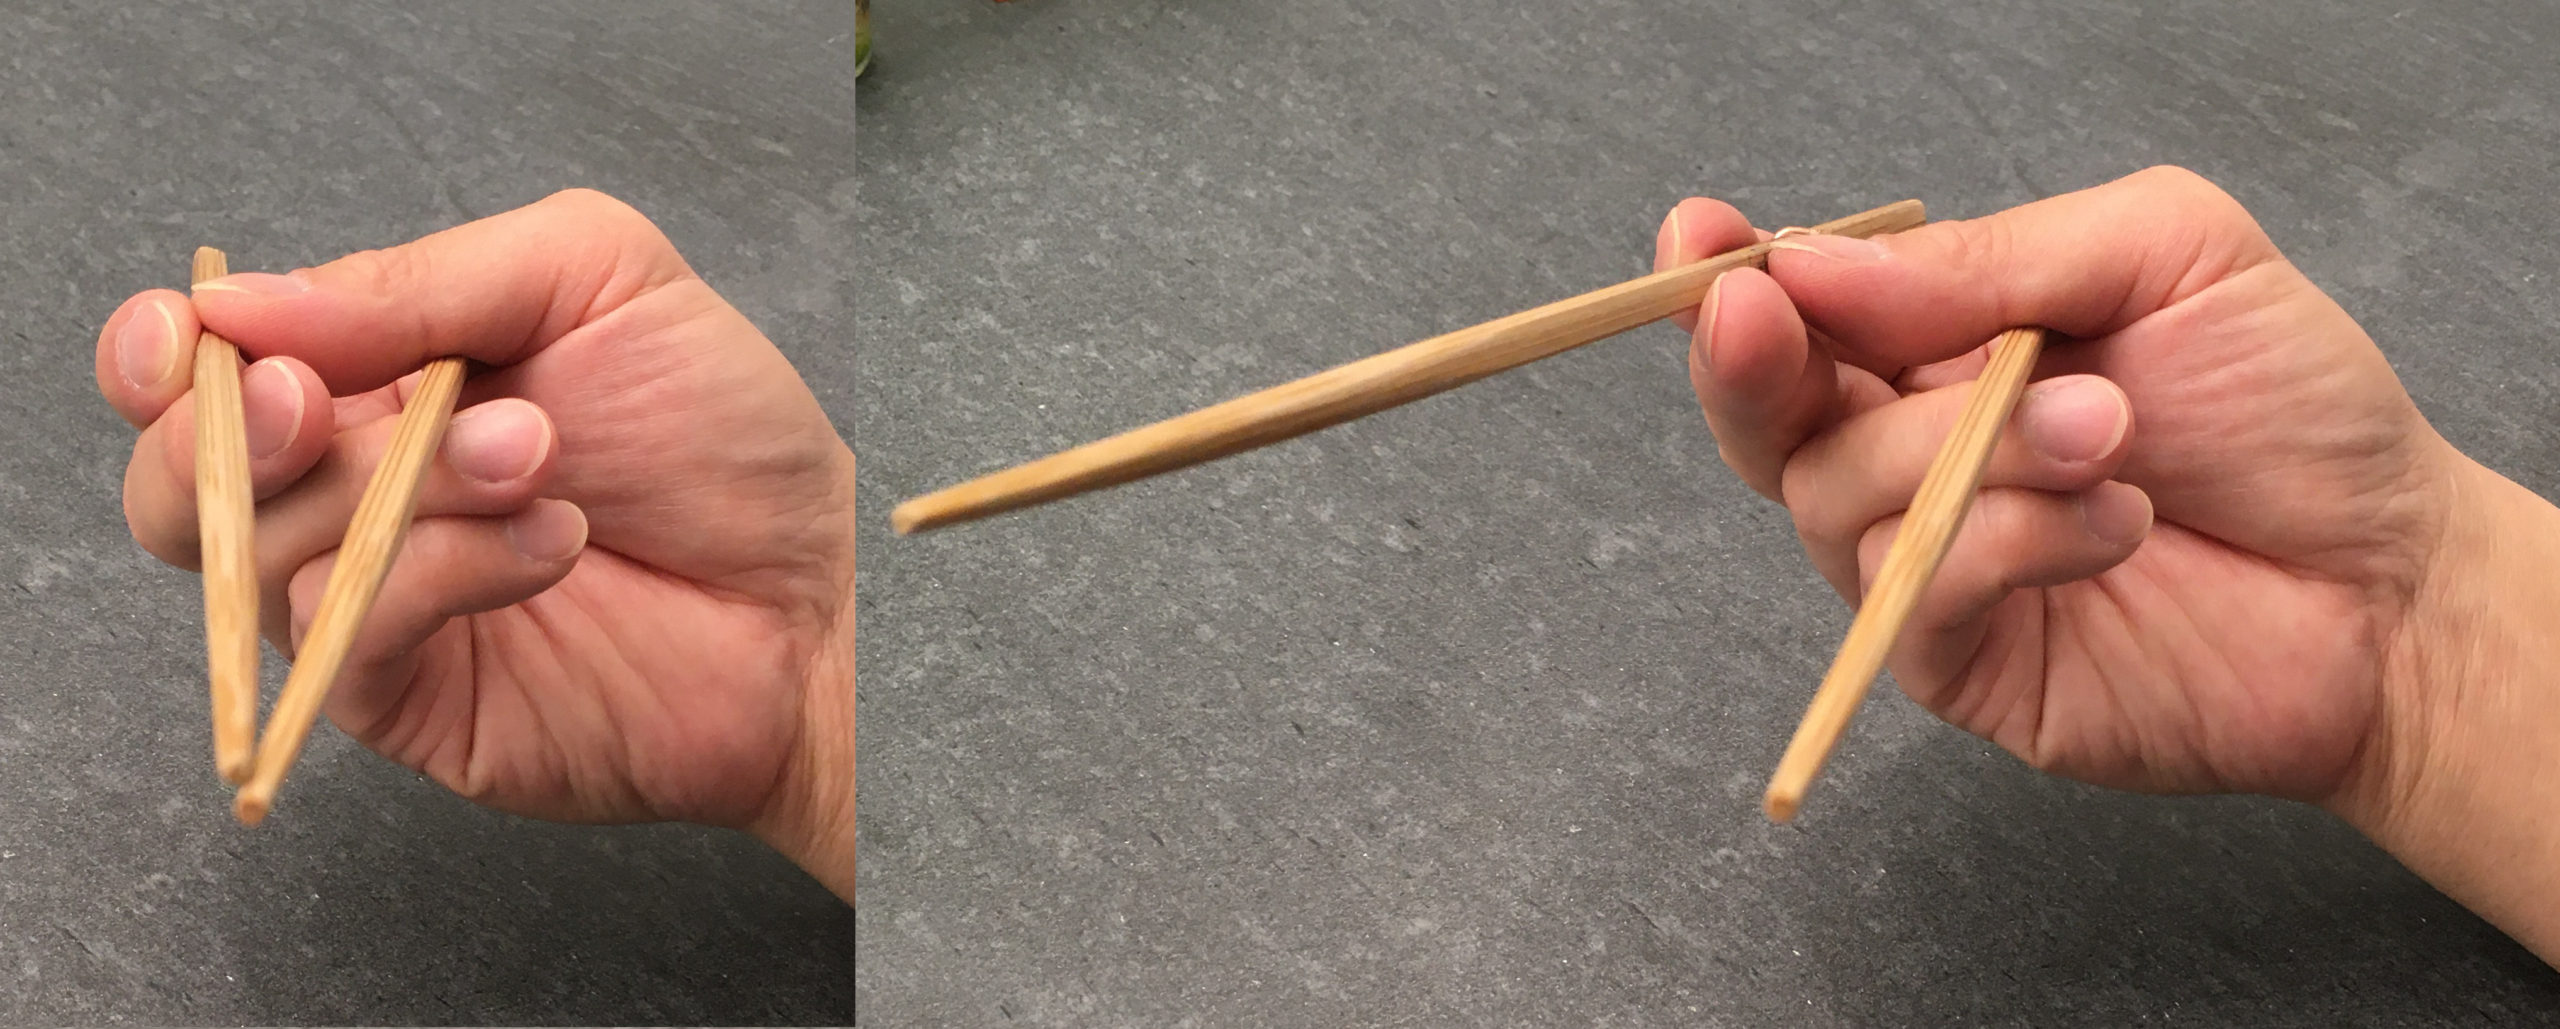
First, put the bottom chopstick aside for a moment. Imagine that the top chopstick you hold between the thumb, the index finger and the middle finger were a pen. Hold it as if you were going to write with it. Look at the animation below, and roll the chopstick using the three fingers in the same way. And then roll the stick back. Keep practicing this rolling action until it becomes second nature.
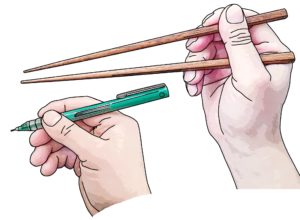
Compare the above finger posture gripping a chopstick, to the pictures shown below, illustrating the traditional tripod hold on a pen. They are identical. For the curious ones, dig deeper into this pen-chopsticks relationship at Hold Chopsticks like a Pen.
Now, put that chopstick aside as well, for a moment. You know about the “air quote” gesture, right?

Practice the air quote gesture as shown below.
It is time to combine what you have learned in step 1 and step 2, into a single motion. Take up the chopstick again, and hold it as if writing with it, per step 1. As you roll the chopstick with the three fingers, make the air quote gesture per step 2, at the same time. This will feel awkward at first. But eventually you will get the timing right. This is what we call the “twirling” motion of chopstick wielding.
Once you have mastered step 3, revisit the first section on “Initial Finger Posture”. Place both chopsticks into your hand, and assume the initial, closed posture. Use your left hand to hold the bottom chopstick immobile. And perform the twirling motion. Remember to continue to roll the top chopstick, as you make the air quote gesture.
Planetary gear train principles
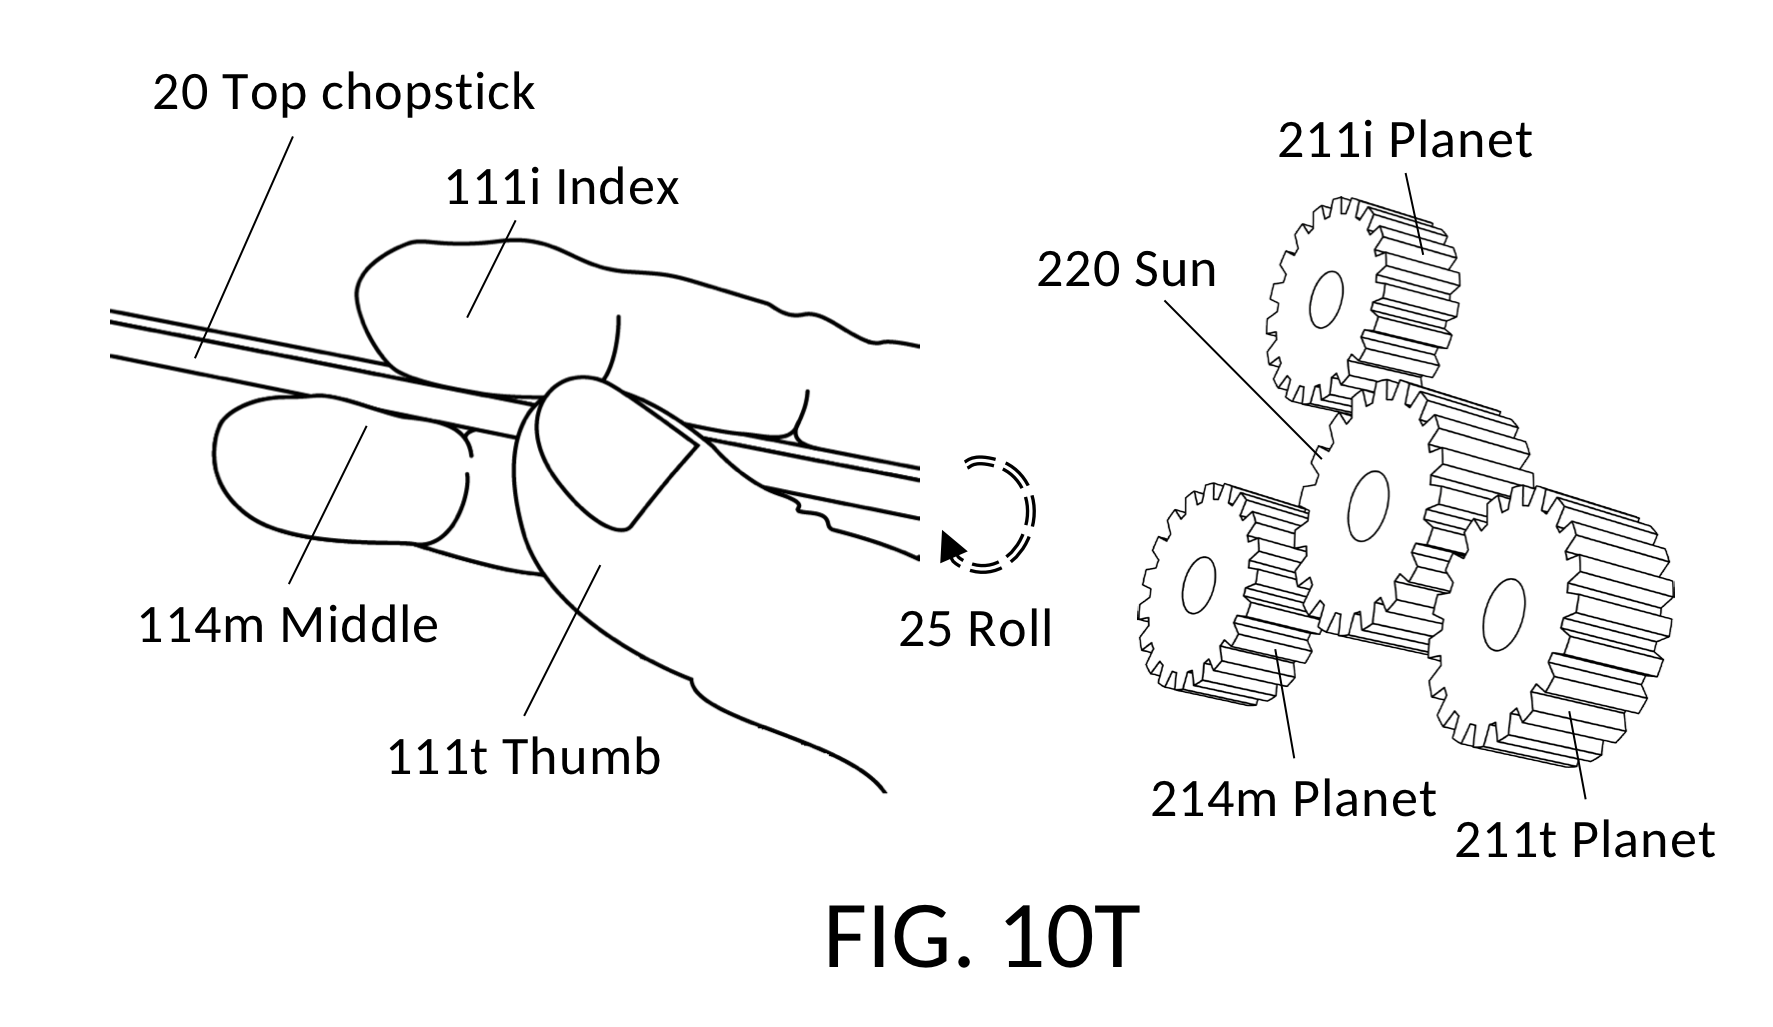
Congratulations, you have mastered chopstick twirling! And you now understand why the top chopstick is not a lever. What you have just learned is in fact known as a planetary gear train in the mechanical engineering world. See the illustration shown below. Note that the ring gear has no physical equivalent in the human hand. Instead, the anatomy of the human hand and fingers is such that when a chopstick is placed between the tip of the index finger, and the distal knuckle of the middle finger, an air-quote gesture acts as a virtual ring gear to synchronize rolls of the three fingers.
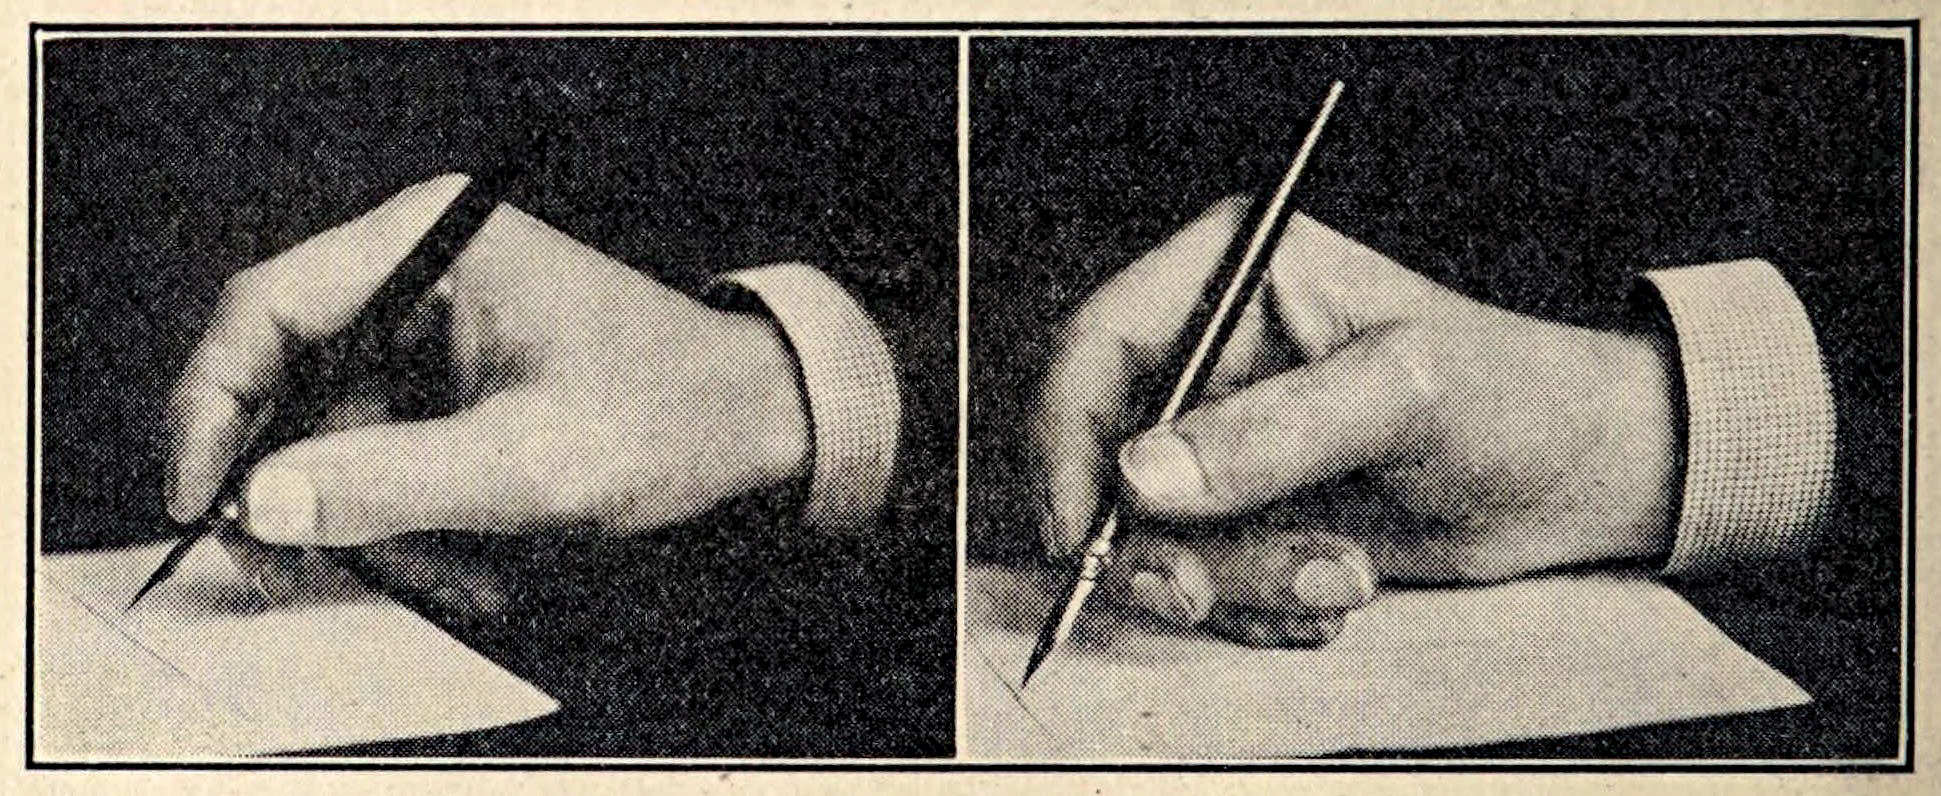
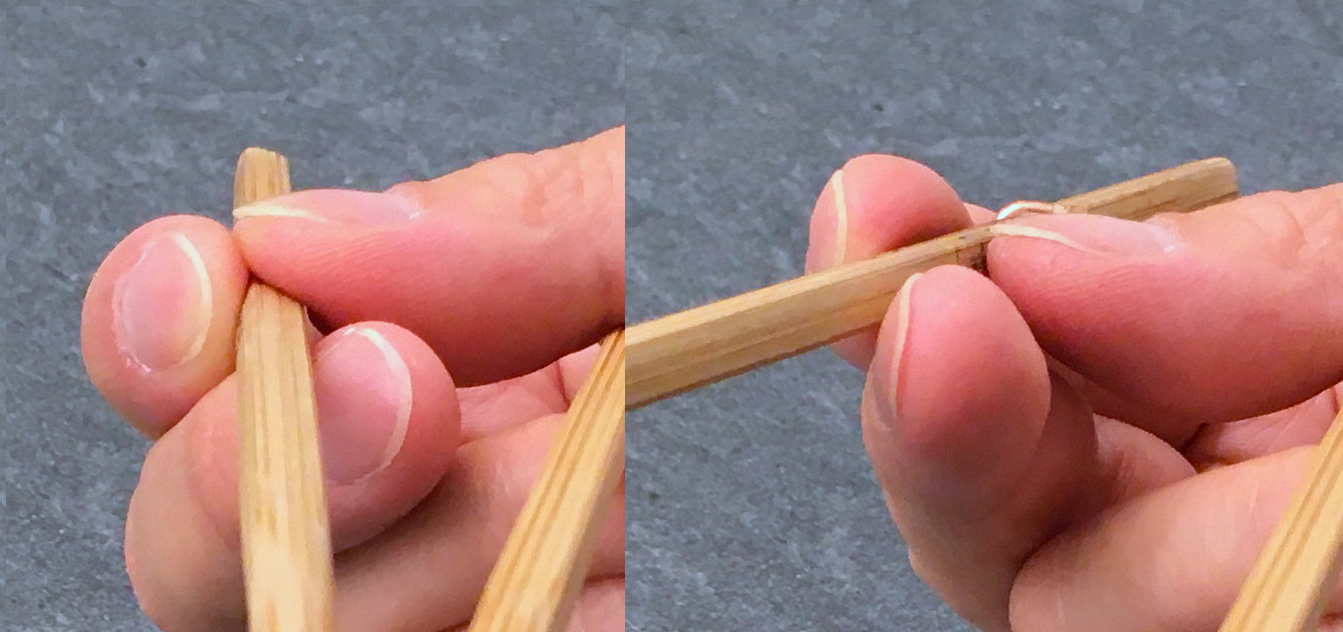
Confirm that you have got the thumb rolling the top stick against the index finger, using the following two pictures.
Here are close-up pictures of the same. Note how the thumb tip appears to “move” across the surface of the stick. But in reality, it “meshes” with the surface as if it sported gear teeth. By meshing and locking onto stick surface, the thumb tip is able to roll the stick for 90° around its longitudinal axis. This 90° rolls can be clearly seen between the closed posture on the left, and the open posture on the right.
Also note how the index finger similarly meshes with stick surface. Thus the index finger seemingly “moves” across stick surface. But in fact it rolls the stick as if both were gears.
We made a short introduction on planetary gears and chopsticks:
There is also an article that covers this topic in depth: Planetary Gears and Chopsticks.
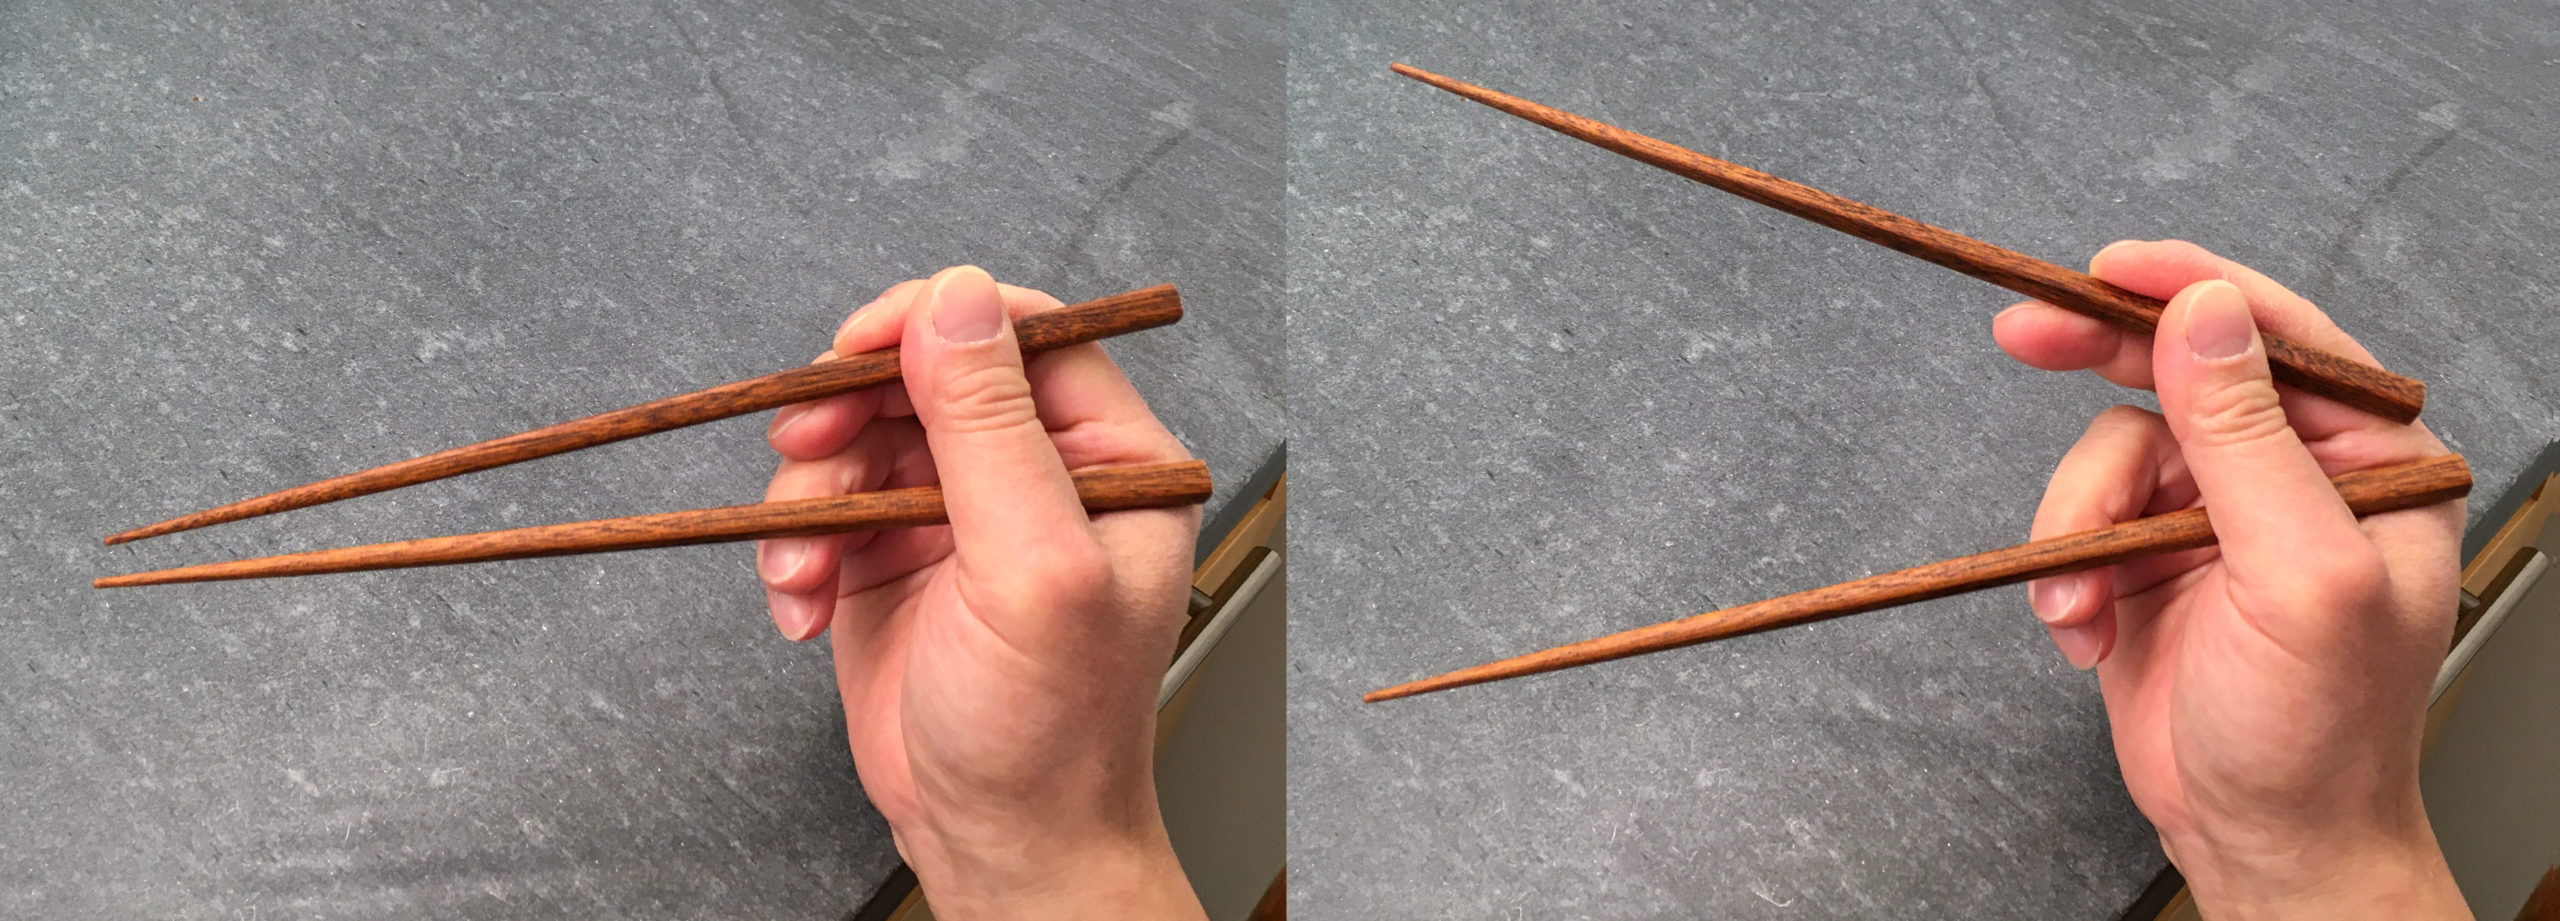
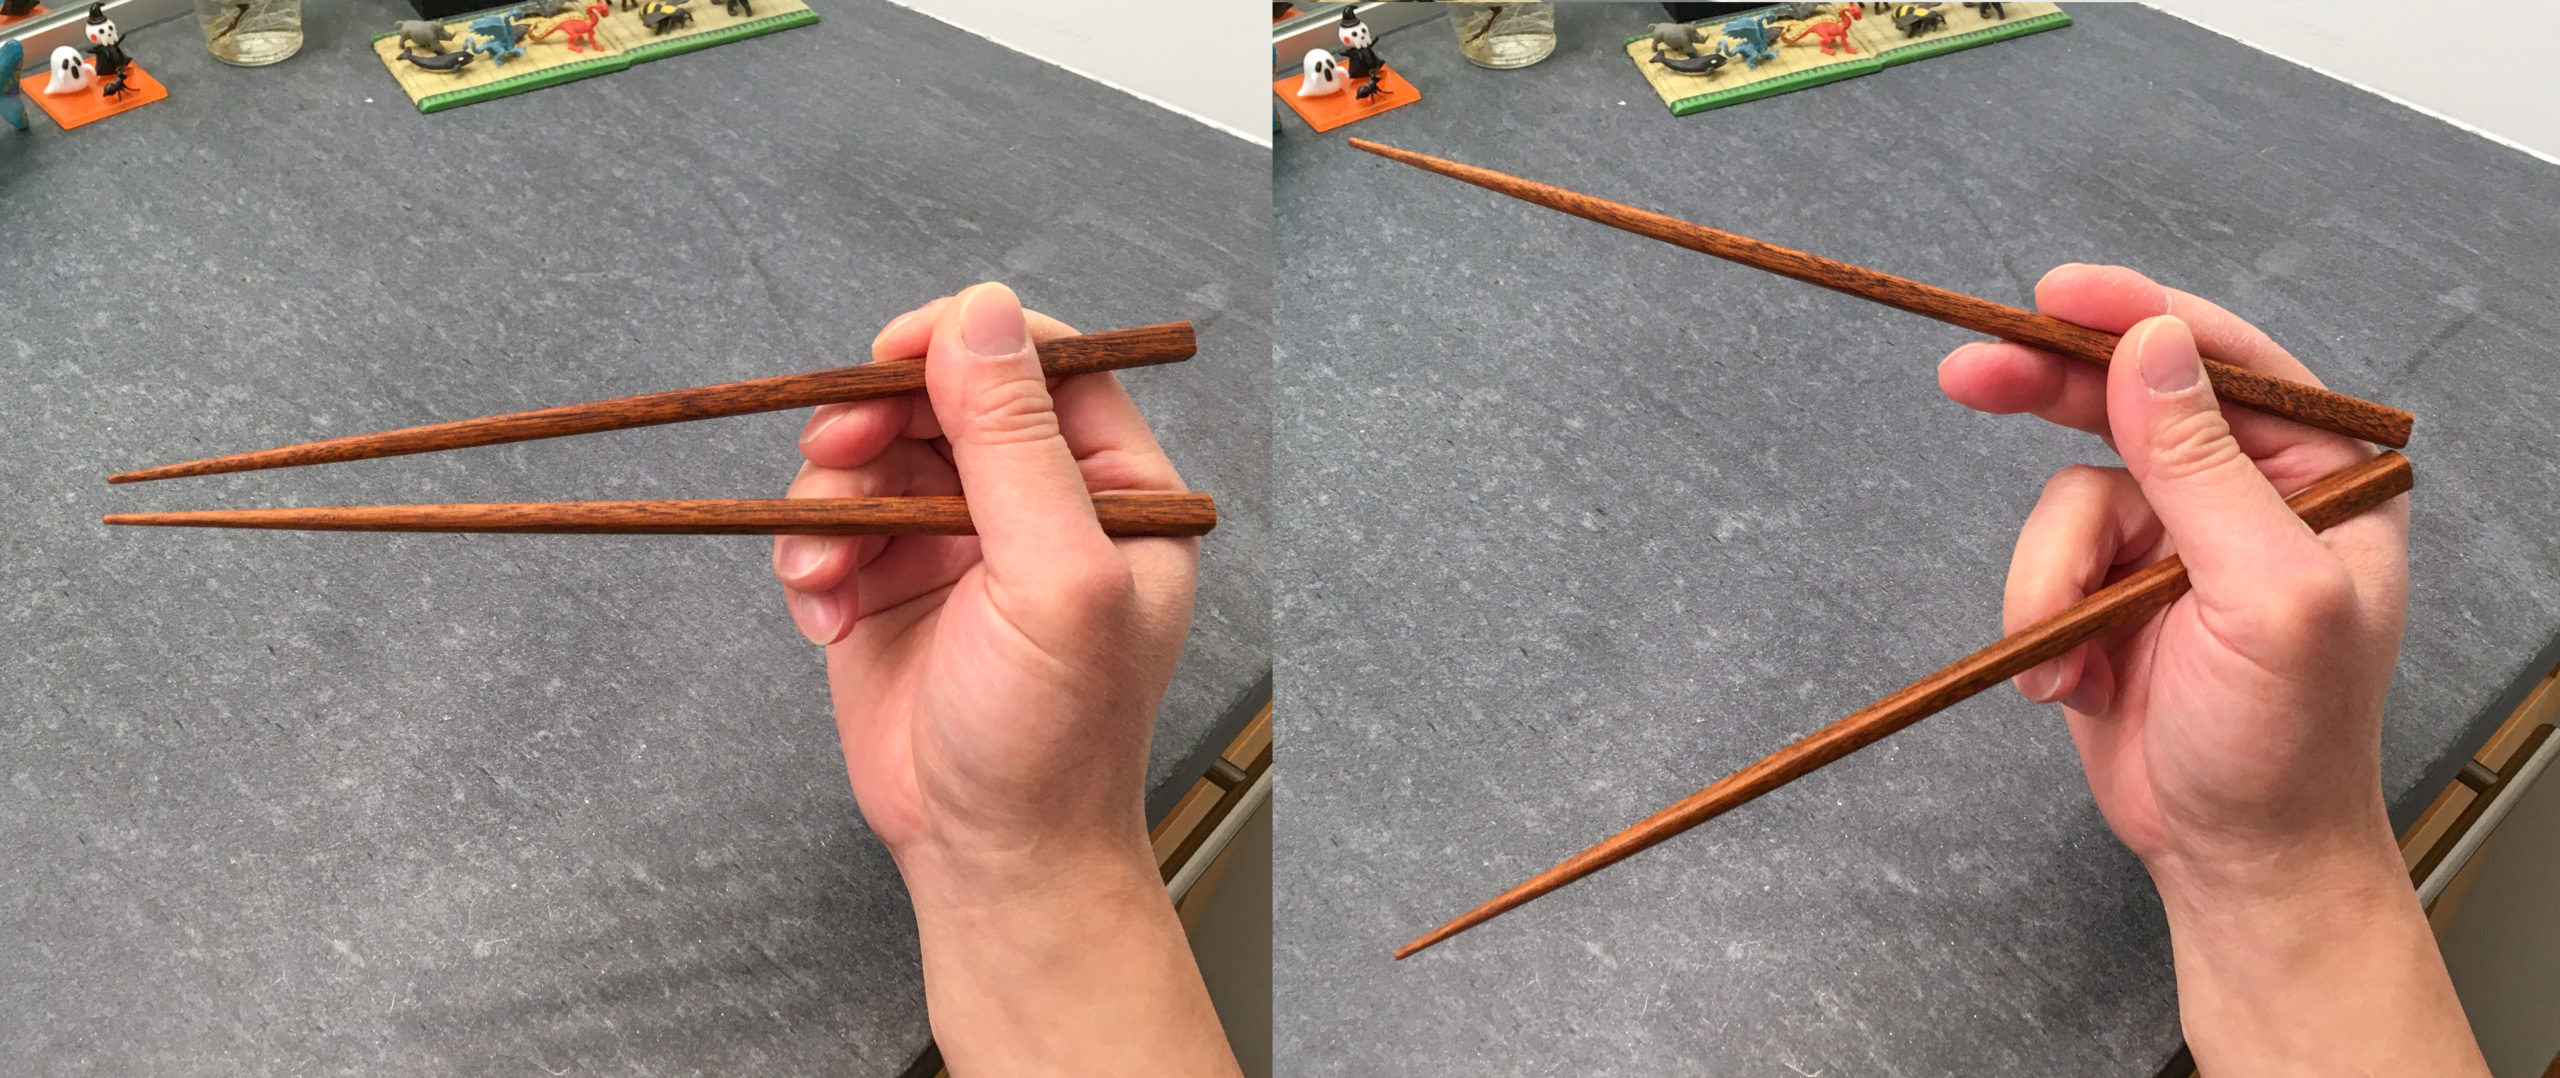
Alternating motion between closed/open postures
When tips of chopsticks close in and touch each other, the finger posture is known as the “closed posture“. When tips are extended apart, we call it the “open posture“. Fingers twirl chopsticks back and forth between these two postures, forming the “alternating motion” of the Standard Grip.
The Standard Grip article also shows the bottom chopstick being moved by the hand. That’s for advanced users. We will cover that, as yet another application of the planetary gear train, in the future.
A good understanding of how and why the standard grip works is necessary for the analysis of alternative grips found in the real world. Many articles on alternative grips, such as the one on the Idling Thumb Grip, will reference this article as they compare those grips to the standard grip.
How to securely hold chopsticks
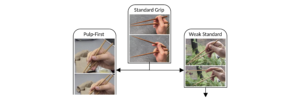
The “initial finger posture” section already discussed how to securely hold both the top chopstick and the bottom chopstick, at the initial placement stage. Here we repeat the same, from a slightly-different angle, as a reminder that one must not neglect to continue to secure both chopsticks, throughout the alternating motion. A temporary lapse in securing chopsticks is the number one root cause for many deviations from Standard Grip, as we have observed in Weak Standard Grip.
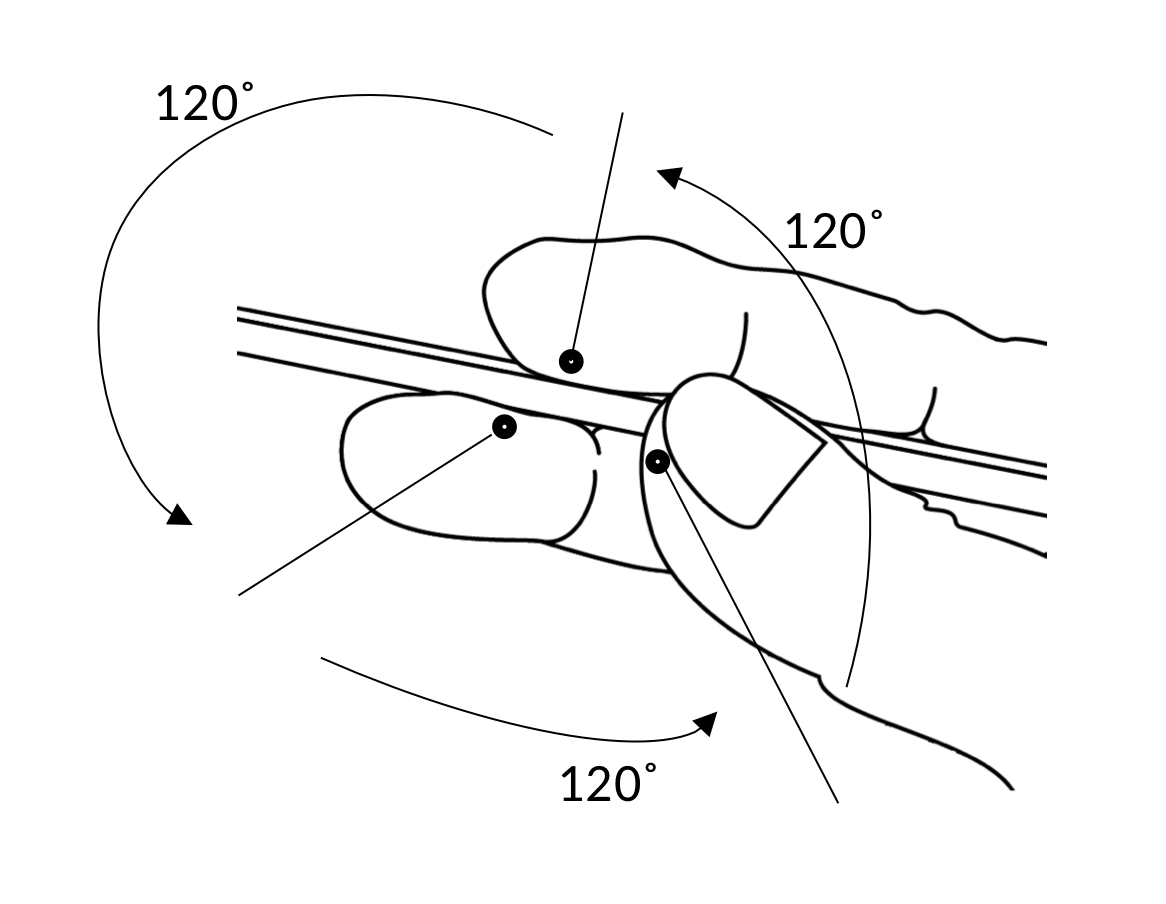
The tripod hold on top chopstick
Let’s start with the “tripod hold“. This is a term we made up, to describe the way the thumb, the index finger, and the ring finger cage the top chopstick. It is just a short label that captures the the idea that three fingers mesh with the surface of the top chopstick, with roughly the same distance between any two fingers. They surround the top chopstick each with a normal vector pointing directly towards the center of the chopstick. The three fingers thus divide the cross section of the chopstick into tridants, each spanning 120 degrees. “Tridant” is also a term we made up. You can call traidants trines, if that that floats your boat.
The 3-point-support (or three-point-support) is a term popularized by Kawasoko Yoshiaki in his 2001 patent. His drawings can be found here. Kawasoko used this term for both the top chopstick and the bottom chopstick. This term refers to the fact that at least three supporting points are required, for either chopstick to be properly secured.
The 1-on-2-support on bottom chopstick
For our purpose, we shall use “tripod hold” when describing how to securely hold the top chopstick. We will use another term, “1-on-2-support“, to indicate how the thumb, the ring finger and the purlicue secure the bottom chopstick.

The “1” in 1-on-2-support refers to the base of the thumb, which sits on top of the bottom chopstick, to firmly hold it against two supporting points. The latter being the “2” in the 1-on-2-support, referring to the purlicue and the distal knuckle of the ring finger. The user must maintain, throughout the alternating motion of fingers and chopsticks between the closed posture and the open posture, proper pressure at the thumb base, to keep the bottom chopstick from shifting or falling off. This in turns confer power and leverage to the maneuver. With power and leverage comes accuracy and dexterity, for fine manipulations of items by these chopsticks. As a future article on the physics of chopsticks will highlight, the 1-on-2-support is actually a form of planetary gear train as well. In this case, there are two planet gears, instead of three. But that’s for another day.
We will be referring to the tripod hold and the 1-on-2-support throughout this website. These form the basis of proper Standard Grip technique. Many alternative grips are really a result of temporary or permanent neglect of one of these two principles. For instance, some weak standard grips are a result of a lapse of the thumb in its tripod hold duty. Idling Thumb is a permanent form of this lapse. Some weak standard grips are a result of a lapse of the ring finger in its 1-on-2-support duty. Vulcan Grip is a permanent form of this lapse.
Keep the thumb flat
Both finger placement and standard grip motion rely on the thumb being flattened. With this flat thumb pose, the base of the thumb can exert enough force to pin the bottom stick against the knuckle of the ring finger, and against the purlicue. At the same time, the tip of the thumb pushes back against the index finger and the knuckle of the middle finger, as all three wield the top stick in concert.
The shape of the flat thumb is such that the bottom stick is prevented from shaking lose, and from inching closer to the top stick, during repeated standard grip motion. Keeping the two chopsticks separated far enough, at the place they intersect with the thumb, is important for the standard grip. At the open posture, it allows tips to extend wide apart, without rear ends of chopsticks colliding. At the closed posture, it enables better control over tips of chopsticks.
This unnatural, flattened thumb pose is not often required in other human activities. We have named it Caswellian thumb pose.
If despite attempts to learn the Standard Grip, you still cannot maintain a good Caswellian thumb pose, then you will probably want to read Caswellian Thumb and Chopsticks. There are alternatives you can pursue.
In a retrospective, The Art and Science of Chopsticking, we dove deeper into the issue of creating a menu of alternative grips. These could serve as options for folks who find such grips easier to wield than Standard Grip.
End results
Once you have mastered the tripod hold and the 1-on-2-support techniques, you will command dexterity, power and speed. Observe video shown below. It is a slow-motion capture of both slow and fast chopstick movements, snapping at thin air.
You may wonder why we characterized the above video as showing both slow and fast chopstick movements. Recall that it is a slow-motion capture. Following is the original video from which the above slomo was extracted, now played back at normal speed.
Training tools you can 3D-print
We make available 3D-printable learner tools, including advanced marcosticks, training marcosticks, ergonomic marcosticks, and finger helpers. To learn more, head to the Training Marcosticks that Work article.
For more on this topic
The intro talked about this article being the first one to disclose how chopsticks really worked. That is true of articles “online”. This article is actually a highly summarized version of a 50-page patent application that we filed a few months prior to this article. That application has since been published by the USPTO, 18 months after the priority date. We have edited it for our web audience: Ergonomic chopsticks – US20210059445A1. It is the earliest account of how chopsticks really work, and has the most detailed explanation on the physics of chopsticks.
#LearnToTwirlMarcosticks
Instagram videos
Note that following pictures and videos are auto-sourced from the instagram tag #HowToUseChopsticks. They don’t necessarily teach the Standard Grip.